-compressed")


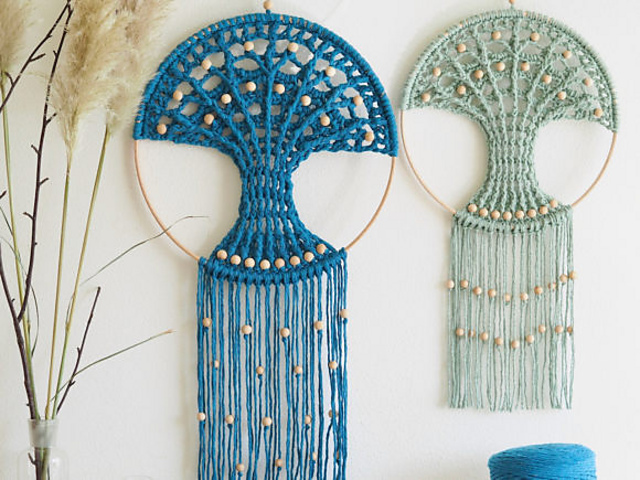
Make your own Tree of Life Wall Hanging. Choose your favorite yarn to make a tree that suits one of the hoops (25, 20 or 15 cm). In this pattern, tension is important because the tree should fit the indicated hoop diameter.
This pattern is made and described with macramé yarn from Durable, which suits a 25 cm hoop. You can also use cotton yarn, you could possibly take several threads together to get a good tension.
All information and the table for the yarns used, tension, and the hoop diameter can be found in the pattern.
Materials: Yarn: Durable macrame 100 g 90 m Hook: 4 mm Other: hoop 25 cm, wooden beads, hook 2 mm, scissors, needle. other sizes: 20 cm made with Yarnart Macrame, 15 cm made with Scheepjes Catona.
Skill Level: intermediate till advanced
This pattern includes:
graph / chart, written instructions, very detailed step-by-step pictures, written instructions are given in the English language (American terminology), graph symbols using US crochet terminology Pattern notes:
The tree is crocheted in rows, you turn your work after each row and work on the right and wrong side. Start crocheting with single crochet stitches around the hoop, then you crochet the crown with branches. The trunk of the tree is fastened around the hoop. Your tree must be smaller than the hoop itself to fit a hoop. Used and Special stitches The used stitches: sc, hdc, dc, and some special stitches: hdc2tog, dc2tog, FPdc, BPdc, FPtr, BPtr, FPtr2tog, FPtr3tog. There is a Photo Tutorial for some of the special stitches in the pattern included.
Using beads The beads are added while crocheting. For this method, you need the beads with a slightly larger hole and an additional crochet hook in a smaller size. There is a Photo Tutorial for using beads in the pattern included.